Installation & Maintenance
How to Install a Taper Lock Bushing — Complete Step-by-Step Guide
Installation & Maintenance
A taper lock bushing looks simple, but the connection only works as intended when the shaft, keyway, mating hub and fasteners are treated as one assembly. A clean taper can seat evenly; a burr, wrong key, mixed fastener or damaged bore can create a problem that shows up later as movement, vibration or difficult removal.
The safest installation routine is therefore methodical rather than fast. Identify the exact EP series and bore first, confirm which holes are used for tightening and removal, and use the approved tightening information for that exact bushing and screw set.
Tools and materials you will need
- Caliper or micrometer for the shaft diameter and a suitable gauge for the key/keyway.
- Correct hex key or socket for the supplied fasteners.
- A calibrated torque wrench when the approved installation sheet specifies a tightening torque.
- Lint-free cloths and a cleaner suitable for removing oil, dirt and machining debris.
- Straightedge or alignment tool for the pulley, sheave or sprocket after assembly.
Pre-installation checks
Measure the shaft rather than relying on an old drawing or a worn nameplate. Check the shaft surface for raised burrs, fretting marks and corrosion. The key should sit correctly without rocking, and the mating hub or pulley must be made for the same taper-bushing family.
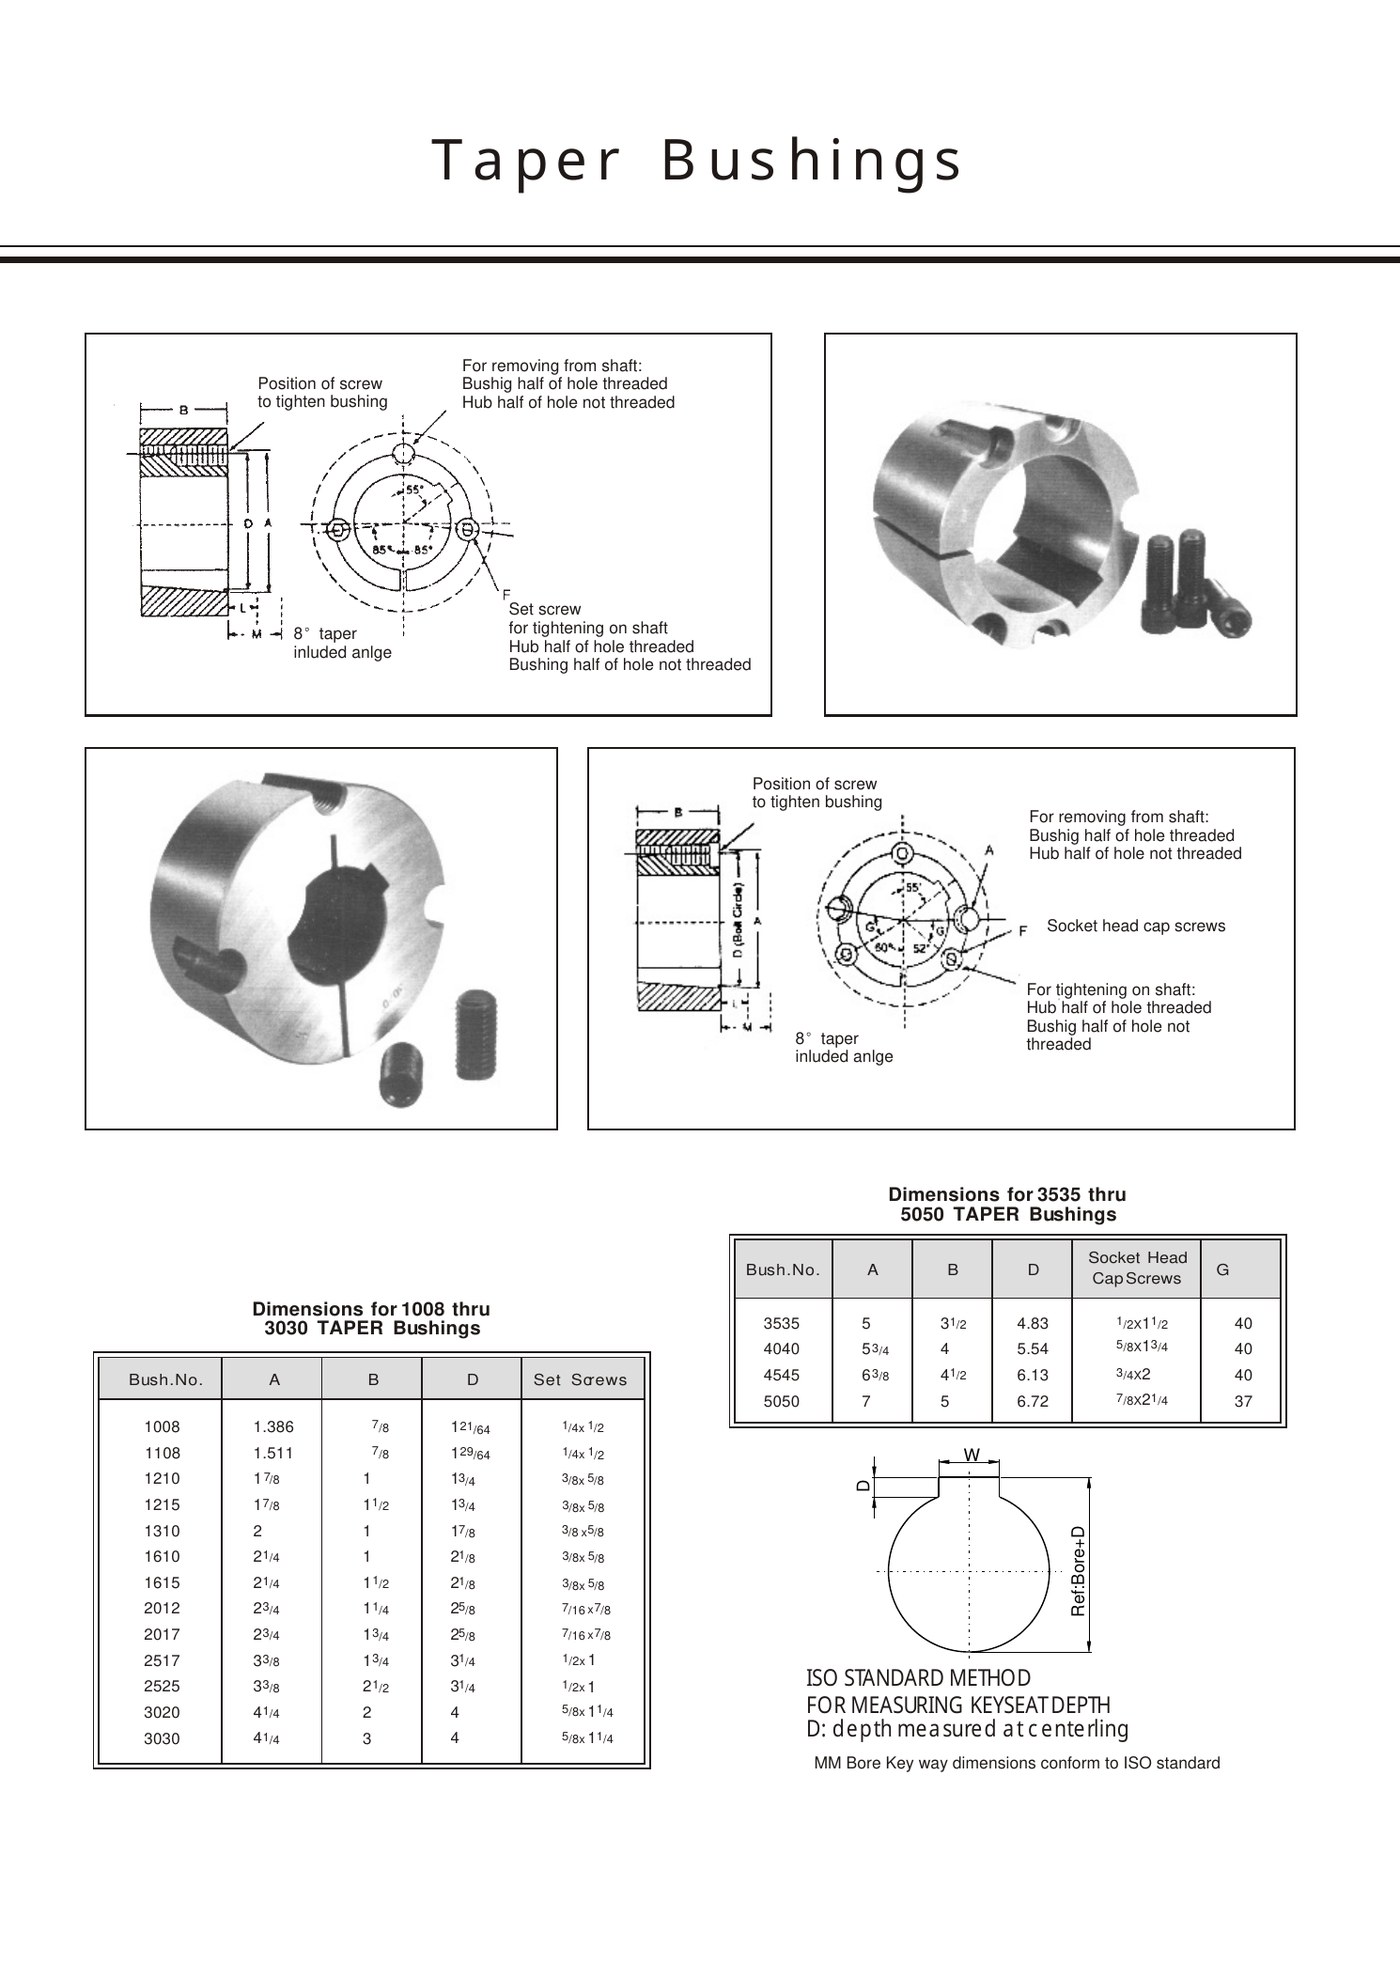
Inspect the bushing itself before fitting. The model, bore and keyway must match the order. Look at the hole arrangement shown on the technical drawing so tightening holes are not confused with the threaded removal or jack-screw positions.
Step-by-step installation process
| Step | What to do | Why it matters |
|---|---|---|
| 1 | Clean the shaft, key, bushing bore and mating taper. | Contamination can prevent full seating. |
| 2 | Fit the key and place the bushing into the mating component. | The keyway and taper must be aligned before load is applied. |
| 3 | Start the correct fasteners by hand in the tightening positions. | Hand starting reduces the chance of cross-threading. |
| 4 | Slide the assembly to the required axial position on the shaft. | Position is easier to correct before the taper is fully seated. |
| 5 | Tighten fasteners evenly in several passes. | Progressive tightening helps the taper seat uniformly. |
| 6 | Apply the approved final tightening value for the exact model. | Fastener size and bushing geometry change across the range. |
| 7 | Check axial position, alignment and visible seating. | A final mechanical check catches assembly errors before operation. |
Fastener reference by taper-lock series
Fastener size is useful for identification, but it is not a tightening-torque chart. Do not calculate or copy a torque value from a different series simply because the screw diameters look similar.
| EP series | Listed fastener |
|---|---|
| EP-1008 | 1/4 x 1/2 set screws |
| EP-1108 | 1/4 x 1/2 set screws |
| EP-1210 | 3/8 x 5/8 set screws |
| EP-1215 | 3/8 x 5/8 set screws |
| EP-1310 | 3/8 x 5/8 set screws |
| EP-1610 | 3/8 x 5/8 set screws |
| EP-1615 | 3/8 x 5/8 set screws |
| EP-2012 | 7/16 x 7/8 set screws |
| EP-2017 | 7/16 x 7/8 set screws |
| EP-2517 | 1/2 x 1 set screws |
| EP-2525 | 1/2 x 1 set screws |
| EP-3020 | 5/8 x 1 1/4 set screws |
| EP-3030 | 5/8 x 1 1/4 set screws |
| EP-3535 | 1/2 x 1 1/2 socket head cap screws |
| EP-4040 | 5/8 x 1 3/4 socket head cap screws |
| EP-4545 | 3/4 x 2 socket head cap screws |
| EP-5050 | 7/8 x 2 1/4 socket head cap screws |
Common installation mistakes
The most frequent problems are avoidable: using the wrong holes, tightening one screw fully while the others are loose, installing over a dirty or damaged shaft, and assuming a visually similar bushing is equivalent. Another common error is to force the hub into position after the taper has started to grip; position the assembly first, then tighten.
If the machine uses several pulleys or sprockets, verify alignment at the system level. A correctly seated bushing cannot compensate for a misaligned drive, bent shaft or damaged hub.
Post-installation run-in check
After the machine is returned to service, observe the drive for abnormal vibration, noise, heat or relative movement. Re-check the assembly in accordance with the machine maintenance procedure and the approved bushing instructions. If witness marks appear between the hub, bushing and shaft, stop and investigate rather than simply adding more tightening force.
Frequently asked questions
Should the screws be fully tightened one at a time?
Use an even, staged pattern so the taper seats progressively. The final value must come from the approved instructions for the exact bushing and fastener set.
Can I install a bushing if the model marking is unreadable?
Identify the family from dimensions, fasteners, bore/keyway and the mating hub before installation. A visual match alone is not enough.
Related products and resources
Need help with a real application?
Send the model, shaft diameter, keyway or drawing so the enquiry can be checked against the correct bushing family.